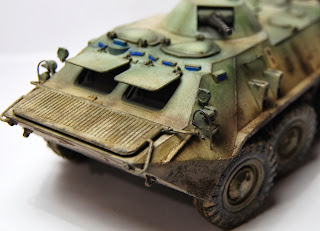
KIT E MONTAGGIO
Il
kit zvezda 3556, si presenta con delle buone stampate color
verde, due grandi sezioni per lo scafo, otto gomme in vinile, un
foglio decals.
lL montaggio risulta semplice, la zona asse ruote motrici è workable.
Tutte le parti combaciano alla perfezione risultandone una estrema facilità di montaggio.
I maniglioni sullo scafo, errati nelle dimensioni "piu lunghi"
rispetto all'originale, sono stati rifatti con filo di ottone da 0,5 mm.
Anche le pedane ,troppo
squadrate nella forma , sono state sostituite con filo da
0.5mm.
Ho riprodotto il fango secco con stucco per modellismo
diluito con acetone
KIT AND ASSEMBLY
The kit zvezda 3556, is printed with good green plastic , two large sections for hull, eight vinyl wheels and small decals sheet.
The assembly is easy , the drive wheel is workable.
The assembly is easy , the drive wheel is workable.
All parts fit together perfectly.
The handles on the hull, in the wrong size, "more long" than the original, have been redone with brass wire of 0.5 mm.
Even the footrests, too wrong in shape, have been replaced with 0.5mm wire.
I have reproduced the dried mud with modeling putty diluted with acetone.
The handles on the hull, in the wrong size, "more long" than the original, have been redone with brass wire of 0.5 mm.
Even the footrests, too wrong in shape, have been replaced with 0.5mm wire.
I have reproduced the dried mud with modeling putty diluted with acetone.
LA COLORAZIONE
Questa
è la parte che preferisco e che mi diverte di più,viste le
dimensioni del kit dalla forma abbastanza piatta, ho deciso di
iniziare con un preshading usando un german grey vallejo air
insistendo sulla parte bassa "più in ombra",poi zona
portelli,torretta, tutta la parte riguardante la zona motore.
Poi
usando la tecnica della modulazione del colore sono partito con la
base con sessioni ad aerografo,colore molto diluito cercando di non
coprire il preshading,usando sempre i colori della vallejo air, con
un mix di russian green, camouflage green e del beige.
Per le luci
sono partito dalla miscela usata per la base via via aggiungendo del
beige e solo in alcuni punti ho aggiunto pochissimo bianco.
Finito
il lavoro della camo, ho iniziato la fase pre impolveramento , sempre
ad aerografo, partendo dalla parte bassa del kit usando un vallejo
panzer aces leather belt con un po di sabbia scura sempre
vallejo,poi risalendo sempre di più verso la parte alta ho schiarito
il colore aggiugendo del beige, fino ad usarlo puro nelle zone di
confine camo e impolveramento.
PAINTING
This for me is the best and more fun part of the work.
I decided to start with a preshading using
a german grey vallejo model air because the size of the kit is fairly flat shape
I insisting on the lower part " in
the shade " , then the doors , turret, all part of engine.
Later using the technique of modulation of
the color , started with the basic sessions with an airbrush , color
very diluted , trying not to cover the preshading , always using the vallejo air . For that i use a mix of ussian
green , gree
camufflage and beige.
I did the lights started from the mixture used
for the base, gradually adding beige and only ain few points I
added a little part of white .
I started the
pre dusting , with an airbrush , starting at the
bottom of the BTR using a vallejo panzer aces leather belt with a bit
of dark sand ; going down I added beige and use pure in the intermediate zone between the base color and and dust.
INVECCHIAMENTO
Ho iniziato con un leggero chipping,usando la tecnica della spugnetta, insistendo sulla parte scafo intorno alla torretta,portelloni, vano motore.
In seguito con una mina 0,4 ho simulato le zone più lucide è di maggiore sfregamento, maniglioni,spigoli e simili.
Poi un lavaggio selettivo con colore ad olio bruno van dyck, eliminando l'eccesso con un cotton fioc.
Ultima fase, pigmenti, russian earth e un european dust della mig, applicandoli direttamente con un cotton fioc, european dust per le luci e il russian earth sulle zone più in ombr , piastre laterali scafo e parte bassa.
Le ruote hanno subito lo stesso trattamento dello scafo.
WEATHERING
I started with a light chipping, using the technique of sponge, insisting on the hull around the turret, doors, engine compartment.
After with 0.4 mm mine , i simulated greatest friction in the areas of polished, handles,corners and similars.
Then i did a selective washing with oil color brown van dyck, removing the excess with a cotton fioc
Last stage, pigments, i use russian earth and european dust mig , applying them directly with a cotton fioc , european dust for the lights and the russian earth on the shadows areas hull plates and bottom.
Last stage, pigments, i use russian earth and european dust mig , applying them directly with a cotton fioc , european dust for the lights and the russian earth on the shadows areas hull plates and bottom.
The wheels have lose out the same treatment of the hull.


Nessun commento:
Posta un commento